If you want your newly-knitted hat to look its best, I really recommend taking the time to finish your hat by blocking it, especially if you’ve used lace stitches or colourwork. You’ll be able to tidy up uneven stitches (at least to a certain degree) and open up a lace or mosaic pattern.
Read MoreHow to block scalloped edges
The scalloped edges of my Beeswax Shawl are one of its most special features, formed by working increases or decreases at the ends of certain rows. I was determined to preserve these rippling edges during blocking, and I came up with the following method which worked very well. This method could be adapted for any shawl with a rippling edge, if you want a very even ripple and/or dislike using lots of pins.
Read MoreHow to work a Provisional Cast On
A provisional cast on is a method of beginning a project using waste yarn that will be unpicked later, leaving 'live' stitches which can be loaded onto your needles for grafting. A few of my cowl patterns call for a provisional cast on: Cinnamon Stars, which is knit in the round as a long tube and then grafted, and Folia Loop and my latest Aether Cowl, which are both knit flat and then grafted.
I like the perfectly invisible graft that this technique makes possible - for me, it's well worth taking the extra trouble when casting on. My favourite provisional method is the Crochet Provisional Cast On, which involves crocheting around your knitting needle using waste yarn.
Read MoreHow to block textured knits
Here's the situation: you've just finished knitting something with fantastic texture, either in cables or knits-and-purls, and now you need to block it. Wet-blocking, where you soak the project before laying/pinning it out to dry, can really flatten out texture, especially if you've used a yarn that doesn't 'bounce back' much once it's dry (like an alpaca or silk blend).
I had just this dilemma when I finished my Beeswax Scarf! I had wet-blocked my swatch and been disappointed by how flattened-out it was. Obviously, I was keen to try a different blocking method that would preserve more of the lovely texture!
Read MoreHeartpops Revisited
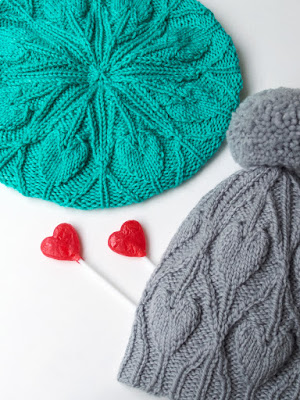
Sometimes I get the urge to re-knit an older pattern and tweak a few things - the colour, the length, various aspects that don't fit my current preference. And sometimes I just really want to add a pompom! My Heartpops hat was released back in February, and I was (and am) super proud of the stitch pattern I invented of 3D hearts in a delicate cabled lattice:

What I didn't love so much, especially when it came time to photograph the hat, was the extremely bright, almost fluorescent colour I'd chosen. It's a fun colour, but it was seriously hard to photograph, especially in sunlight. I also wanted to showcase the hat's other blocking option, which is beanie-style rather than beret-style (blocked over a balloon instead of a dinner plate).
It's the same pattern, but the effect is so different:

First version (Feb 2016)

Second version (Nov 2016)
This second version is much softer and calmer looking, thanks to the change of yarn. This time I used Scout, a lofty DK-weight organic merino from Wool Days, in the colour 'Winter's Day'. The cool neutral grey shows off texture and cables beautifully! Two balls was enough for both hat and pompom.

Another tweak I made was reducing the height of the ribbing a little, because if I'm adding a pompom I want the hat to fit snugly on my head without extra room at the crown - I don't want the pompom to flop around up there. But aside from the yarn change and shortening the ribbing, the pattern is exactly the same as before.
Happily, I still had some of the heart-shaped lollipops left over from the previous photoshoot! If that's not proof of my lack of sweet tooth, I don't know what is. ;)
Find out more about my Heartpops hat pattern, including Ravelry and Payhip purchase options.