Ring-a-ring o' roses

Old-fashioned roses are one of my many obsessions. Since I discovered last year that Melbourne's Royal Botanic Gardens has a 'Species Rose Collection', I've been waiting to visit during its main flowering season. I finally got my chance on Sunday, which was cool and cloudy and suitable for trekking through gardens, smelling all the roses.


The garden included some 'old garden roses' in amongst the wild/species roses. Old garden roses have the best and most intense scent (in my opinion), and they're shaped differently to modern roses. The many-petaled old roses are often quite flat when fully open, with an inner swirl of small petals:

The best-smelling rose in the garden! 'Félicité Parmentier', Alba type, 1834

Félicité is quite small, but very pretty

Because garden roses are propagated by cutting and grafting rather than by seed, all the roses of the same variety are technically part of the same plant. I think it's really cool that the 'Lamarque' rose on my balcony has been around since it was first bred in 1830, in people's gardens around the world.

More interesting, in terms of their variety in size and shape, were the wild or species roses in the collection. In general, they had simpler flowers than the garden roses - most of the wild varieties had 'single' flowers with five petals each. Bees prefer single roses, and one bush in particular was covered in bees! Many had white or very pale pink flowers, but one was bright red (Rosa moyesii), and a couple were yellow (Rosa xanthina and Rosa foetida). Some were downright weird, with giant prickles, or green flowers...

This was a major bee-magnet. I want one! Rosa forrestiana
 
It's a big bush, taller than Willie even

Rosa moyesii

So tiny! Rosa spinosissima (aka pimpinellifolia, aka Scotch Briar)

Rosa viridiflora (yup, that's a flower)

Serious prickles! Rosa sericea omniensis
  
Rosa Amyana cardiganensis

New pattern: INSULATE! mittens

I designed some Dalek mittens to go with my hat. :)
You can download the pattern for free on Ravelry: INSULATE! mittens


I used the same yarn as for my INSULATE! hat, which is '8ply Pure Wool Naturals' from Little Wool Company, in the shades 'Papa' (a greyish brown) and 'Pumice' (oatmeal). I still have over half of each 200g ball left, even after making a hat and a pair of mittens. This yarn is great for colourwork - it's fuzzy enough that the strands on the wrong side felt down slightly with wear, and its 2ply structure helps with stitch definition.

The thumbs are knit plain, with the Dalek's 'weapons' (the famous egg-beater and plunger) completed afterwards in duplicate stitch. Doing stranded colourwork in such a small circumference would be fiddly, so duplicate stitch to the rescue! For an extra touch of whimsy, I added a little heart above each 'weapon' - they could be omitted or replaced with laser beams if you prefer your Daleks evil.


A few helpful links:

The best thing about my new mittens? Epic Dalek battles... teehee... ;)

Getting technical

Considering I've been knitting obsessively for years, it's surprising how few stitches and techniques are solidly, reliably in my memory and ready to go. The list is pretty short: just the basic stitches (knit, purl, yarn-over, k2tog, ssk), the cable cast-on, the long-tail cast-on, a plain bind-off, and weaving in ends properly. Using these and no more, I could make a huge array of knitted stuff. But I'm a nerd and a perfectionist, so I'm always on the look out for new tricks that can add refinement or something cool or special. And that's where the internet and the library come in. :)

This afternoon I was finishing off the top of a knitted mitten, and as always, I had to look up a tutorial on grafting to remember the moves. Looking through my browser bookmarks, I was struck by just how many techniques I use somewhat regularly but never seem to remember the details from last time.

Grafting the top of a stranded mitten (pattern forthcoming!)


Some of the techniques I've used several times, and still need to look up each time are grafting (aka Kitchener stitch), fancy cast-ons like tubular & twisted German, the wrap-and-turn trick for short rows, bobbles, and Jeny's Surprisingly Stretchy Bind-Off. I have a few favourite sites that I look up when I need to learn a new technique or remind myself of one. If it's not there or if I still don't 'get' it, I try searching on Youtube, or the Ravelry forums, or Google.

My favourite knitting instruction sites:
And in book form:
  • Little Red in the City by Ysolda Teague (jersey and cardigan patterns, plus how to get a good fit and other tricks)

I'm much less adventurous with crochet than I am with knitting, so I don't need to look up techniques as often (I mostly stick with basic stitches and granny squares). Continuing my round-up of favourite reference sites and books, here are my crochet handy-helpers:
  • The Attic24 blog ('Patterns and Tutorials' links in the left sidebar)

Lastly, here are my favourite spinning how-tos (I'm still learning the basics):

I'm sure having these all in one place will save me time next time I need to find that one particular video or photo-tutorial. I hope you find some of these helpful! If I've missed any great sites or books, please do share. :)

A brown jersey and a yellow shawl

I finished two projects that have been hanging around for a while. Yay!

The first is a very plain, cosy brown jersey that I started back in August. I actually finished it over a week ago, but I had to wait for suitable photo-taking weather (it was over 30 degrees and putting on a jersey was unthinkable, and then it rained for a week)...


It may be plain, but I think it will be a great 'wardrobe staple'. I'm thinking of making another one with full-length sleeves, in a different colour. More photos and yarn & pattern info are on my Ravelry project page.

I also finished off a bright (very bright!) yellow shawl in a cotton/cashmere blend. It's an asymmetrical triangle shape, with a bobbled fringe. The bobbles were kind of awkward, but I was pretty fast by the end. Likewise with the short-row shaping. :)

Blocking via washing-line

I ran out of yarn - this is the bit I 'fudged'. Looks fine after blocking!

It's nice and big, and drapes really well thanks to the cotton content. Nice and easy to wear - for fans of yellow, anyway! I wore it out shopping on Saturday, and posed in a few colourful places on the way:

Blending in with the brollies

Squid! <3

Dyeing with eucalyptus


I tried a new thing: dyeing wool using bits of eucalyptus tree. I was prompted to try it by reading that eucalyptus is one of the few natural dyes that don't need a mordant (i.e. an additional chemical) to 'fix' the colour. These no-mordant dyes are called 'substantive' dyes - others include lichen and black tea, both of which I've tried in the past. Also, I read that different varieties of eucalyptus can give different colours. I was hoping for a rich orange, but obviously the tree I selected had other ideas... :p

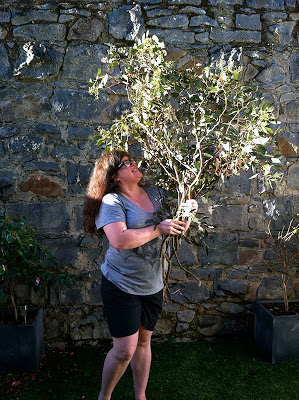
I didn't need to go far to find my materials, as there's a little huddle of eucalyptus trees across the road from our place, by the train tracks.
Willie and I collected a couple of smallish branches which had blown down in a storm, and I stripped off the leaves and some of the bark.

The trees, with bonus shopping trolley

Hello branches, I have plans for youuu...
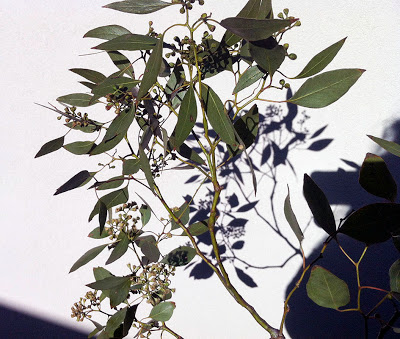
A closer look

Flowering tops; twigs and bark; leaves

I based my dyeing method on these instructions. It's kind of a long process, but worth it for an experiment! And simmering eucalyptus leaves smells really nice - it cleared my sinuses pretty well too (much appreciated after putting up with the Flu That Wouldn't Die).

I used 150g leaves/etc for each 50g skein of yarn (which was undyed Vintage Purls Lace). Equal weights of dyestuff to yarn is usually recommended, but I was going for intense colours (hah). I soaked the plant-parts in water overnight, and then brought them to a low simmer before leaving them to steep again for 24 hours.

I decided to try just the pot with the leaves and the one with the flowering tops first, before committing more of my undyed yarn to the experiment. I brought both pots to a low simmer for an hour, and then added a warm, presoaked skein of yarn to each pot. I was extra gentle with the yarn, because it's not superwash and could felt with too much heat and friction. I simmered the yarn-and-eucalyptus soup for another hour, and let the pots cool overnight.

I removed the yarn, picked out the random bits of plant, and let them dry before giving them a rinse and drying again (apparently you can retain more colour that way).

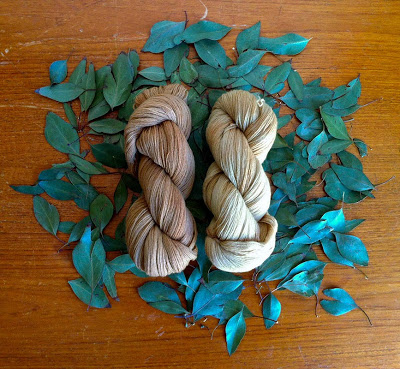
Did I have orange? No, I did not. I had a pleasant-nonetheless warm golden fawn colour. Both skeins looked similar, although the one from the leaves-only pot was less warm-toned. I re-dyed that one darker, using some extra leaves and bark that we collected from a park.

After, and before

I think they look nice together, so I'm going to come up with a two-colour project for them. Something crocheted, perhaps. :)