Baubles II

We're in full-on decorating mode now, with only a few sleeps before Willie's parents arrive and Christmas is go! We have crepe-paper streamers to hang from the ceiling, and woven hearts, paper planes, and assorted origami to hang on ribbons - all in a rainbow colour-scheme. :)

My latest batch of woven hearts <3

As I mentioned in my last post, I'm making some additional red and white crocheted decorations. In the end I decided on Pretty Lacy Bunting, which is indeed pretty and lacy. I made a couple of the 'flags' after brunch today, at the cafe where Julian works:

I had a chai with soy and honey. Yum!

We also bought a small 'adenanthos' tree in a pot, an Australian native that looks a bit like a pine but is non-prickly (and safe for certain members of the household who are allergic to pine). It's now swathed in rainbow fairy lights, candy canes, and tinsel. I crocheted a star for the top of the tree out of sparkly gold curling-ribbon, which worked surprisingly well! I used an old favourite star pattern called Grandma Twinkle.


My old string of crocheted stars (from Christmas 2010) is currently adorning a print of Mt Taranaki. Willie & co come from Taranaki, near the mountain. Several of the pictures in our lounge are reminders of our various 'homes' - we also have a print of Wellington, and two New York posters. I've been meaning to acquire a picture of West End Ohope or one of my other childhood haunts to complete the set.

Baubles

Yup, the Christmas variety. I made some pretty red-and-white decorations to hang on the wall - I think they're very cute and traditional-looking!


The birds are knitted, using a pattern called Bluebird of Happiness, and the hearts are crocheted Danish Hearts. The birds are seamless, and fairly fast and easy if you're comfortable with short rows. The hearts took more time, but I love them! I used to make paper ones as a kid - there's a very simple tutorial here (found via tiny happy).

I think the Christmas fumes must have gone to my head, because I've ordered two big balls of red and off-white cotton yarn to make more decorations!
I'm trying to decide between these cute crochet patterns (all free):

In garden news, our sweet-peas are flowering and smelling amazing, and my baby alpine strawberry plants are getting bigger. And our cherry tomatoes have just started producing ripe ones! I planted a mixed 6-plant punnet of cherry tomatoes, so I'm not sure what varieties we have. The ones with colour on them are all yellow so far.

The first harvest:


The dwarf sunflowers are adding colour too. Yay for yellow. :)

Spot the bee buzzing off!

Making pompoms

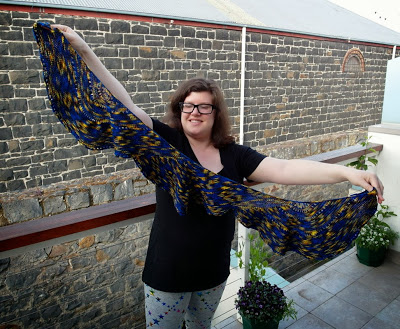
I made three pompoms recently for my Bubble & Squeak hat. I originally wanted one, but when I held it against the hat it looked a little small - so I made two more. I think they look really cute in a cluster. :)

Here's what I did:

1. I made a pair of templates by tracing around cylindrical things (a mug and a small perfume bottle) onto some scrap cardboard (a chocolate packet). I cut it out, and repeated for the second one.

2. I wound a little ball of yarn, small enough to fit through the holes in the templates.

3. Holding the two templates sandwiched together, I wound the yarn around them until I decided I'd covered them pretty well. If you run out of yarn, it's easy to add another little ball - just wind the new yarn over the loose ends to keep them under control.


4. Get the point of your scissors down between the two cardboard templates, and carefully snip through the yarn all around the edge. I used fuzzy, woolly yarn which stayed put during the snipping - if your yarn is less 'grabby', I'd suggest plugging the centre of the circle with a folded paper towel or something, to stop the snipped strands of yarn escaping.


5. Wrap a new strand of yarn around the middle of the pompom, between the two templates. Tie it tightly with a secure knot.


6. Slip off the cardboard templates, trim any longer strands that are sticking out, and fluff up your pompom: roll it in your hands, or hold it by the tail and whack against your hand/leg/whatever.


 7 (optional). To make the tail more substantial, take a crochet hook and with both strands, make a slip knot as close to the pompom as possible. Chain 4, and tie off.

8. Make more pompoms as desired, and attach to your hat!
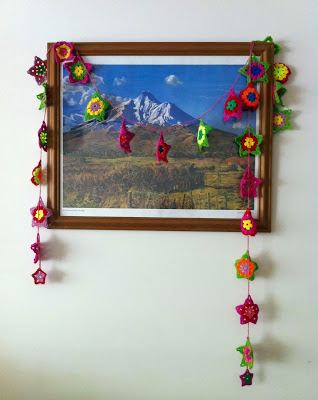
New pattern: Bubble & Squeak

I finished another lovely warm hat - just in time for summer! D'oh! Sometimes knitting inspiration doesn't synch with the seasons at all. :p

My new design is a cabled beanie hat called 'Bubble & Squeak'. The name is a play on a tasty way of using up leftover vegetables - because this hat is a re-do of my Carrot Top hat design. I've made a lot of changes, including to the basic design of the cables. The new version is a bit simpler to knit, but the cables are still moderately complex: I would recommend having some experience knitting cables before trying this pattern.

Before adding the pompoms

With pompoms!

With the brim turned up

Features:
  • braided cables in two sizes, meandering out of the ribbing
  • longer ribbing so you can turn up the brim (or not)
  • easily adjustable sizing of length + circumference
  • a nice tidy tubular cast-on (optional)
  • one or more pompoms on top (optional) - see my mini tutorial on making pompoms
  • 'rest' rounds on every second round
  • both charted and written instructions

The yarn I used is my current fave, 8ply Pure Wool Naturals in 'Pumice' from Anna Gratton's Little Wool Company. I'm looking forward to doing more cabled projects in this yarn, it suits them very well!

The pattern download for Bubble & Squeak is available on Ravelry.

 ----------------------------------------------------------

Just for fun: this is what happens when a New Zealander goes to the beach on a chilly evening - a woolly hat and jumper, worn with shorts and jandals. ;p


Messing about with a bubble wand is a great way to pass the time before one's fish & chips are ready. :)

Ka-pow!

I finally used some special yarn I've been hoarding since last year. I found the perfect pattern for it, and a certain nerd-tastic event this month gave me the final nudge...


The pattern is Rondelay by Jennifer Dassau, and it was surprisingly easy to knit. It's made up of three 'rondels' or semicircles, but they're knit continuously in one piece - it's very clever indeed! The garter-stitch looks great with my variegated yarn, and the colours have 'pooled' slightly differently in each rondel.

The yarn is from Nerd Girl Yarns, in a colour called 'Blue Box Exploding'. It's inspired by this image from an episode of Doctor Who - an exploding TARDIS, as painted by Van Gogh:

From 'The Pandorica Opens', DW series 5

It makes sense in context. Well, TV sci-fi kids-show sense. ;)

This month is the 50th anniversary of Doctor Who, and I celebrated by knitting. And watching the special episode of course (we loved it)!
Hi, my name is Amy, and I am a nerd.