Indigo and cobalt

I have a pretty-pictures post for you today! I visited the NGV on Sunday after choir, and saw an exhibition that's been on my to-see list for a while.

Blue: Alchemy of a Colour definitely lived up to my textile/dye geek expectations, once my eyes adjusted to the dim lighting. I really enjoyed seeing all the different textile decoration techniques from various places and time periods - and it was so much easier to see the details and differences in real life. Being able to see the texture of the fabric from various angles makes such a difference. That said, I hope you find my photos interesting! ;)

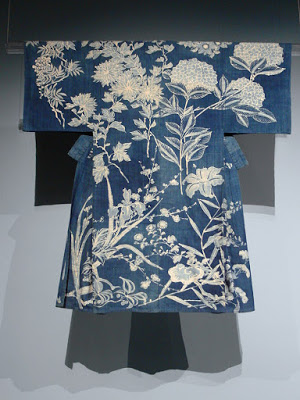
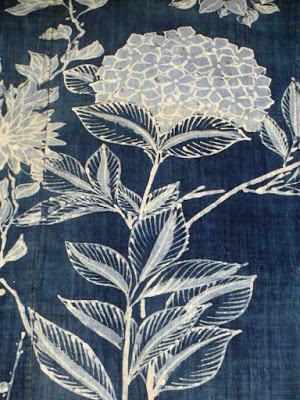
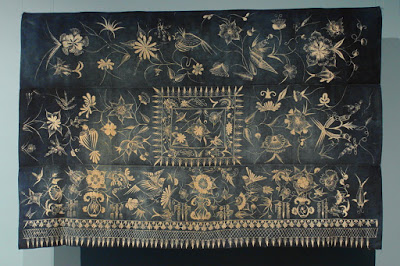
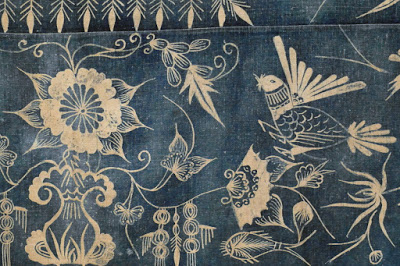
Most of the fabrics below are dyed with indigo. This beautiful kimono and wall hanging were decorated using resist techniques, which you can read about here: Resist-Dyed Textiles.

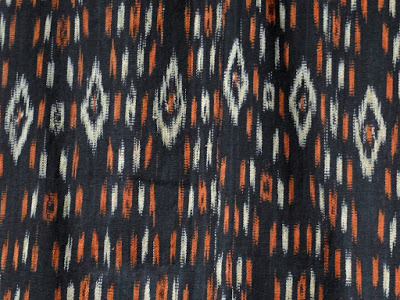
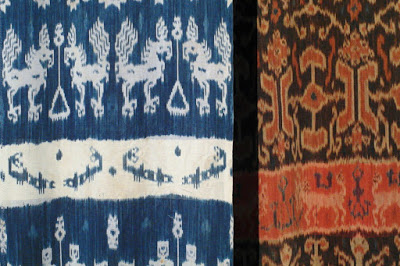
And here are examples of ikat fabric, where the threads are resist-dyed in a pattern prior to weaving. You can find out about how it's made in this photo gallery: Making Ikat Cloth.

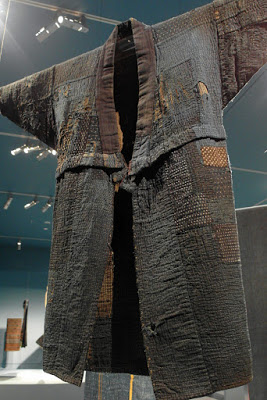
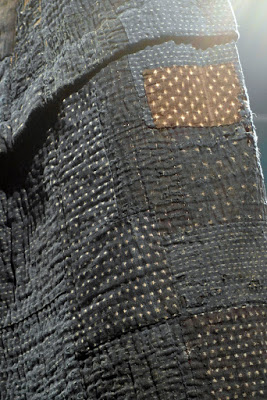
The 'rag kimono' below is an example of boro patchwork, a traditional Japanese form of visible mending. You can see the parallel lines of running stitch holding the layers together in the close-up photo.

You can read more about traditional boro and sashiko embroidery here: The Japanese Art of Sashiko Stitching; and you can see examples of modern sashiko-inspired visible mending here: Three Easy Ways to Mend Fabric, Inspire by Japanese Textiles.

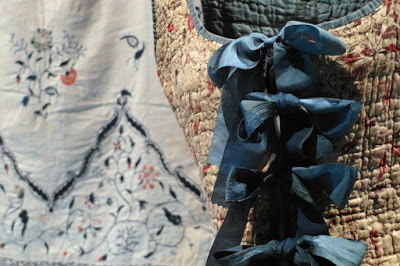
This quilted bodice with indigo-dyed silk ribbons and 18thC embroidered bedspread are just too pretty, especially with the depth of colour in the ribbons. I recognised the bedspread from last year's 'Exquisite Threads' embroidery exhibition...

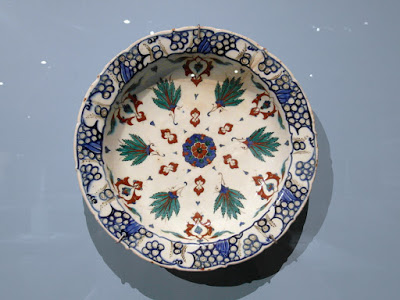
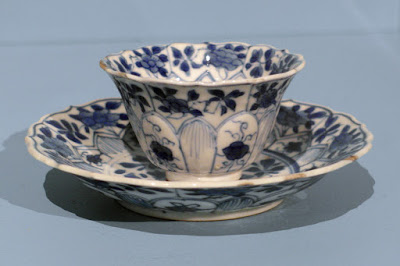
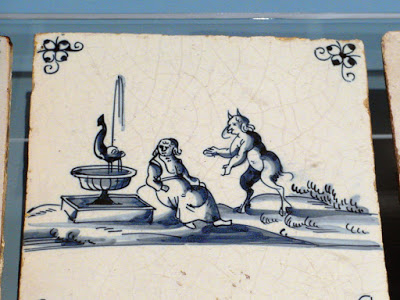
Lastly, I had a look at the ceramics. This article on the exhibition describes the use of cobalt in ceramic decoration, which goes back over 1,000 years. The 18thC Delft tiles were especially cute! I've included by favourite below...

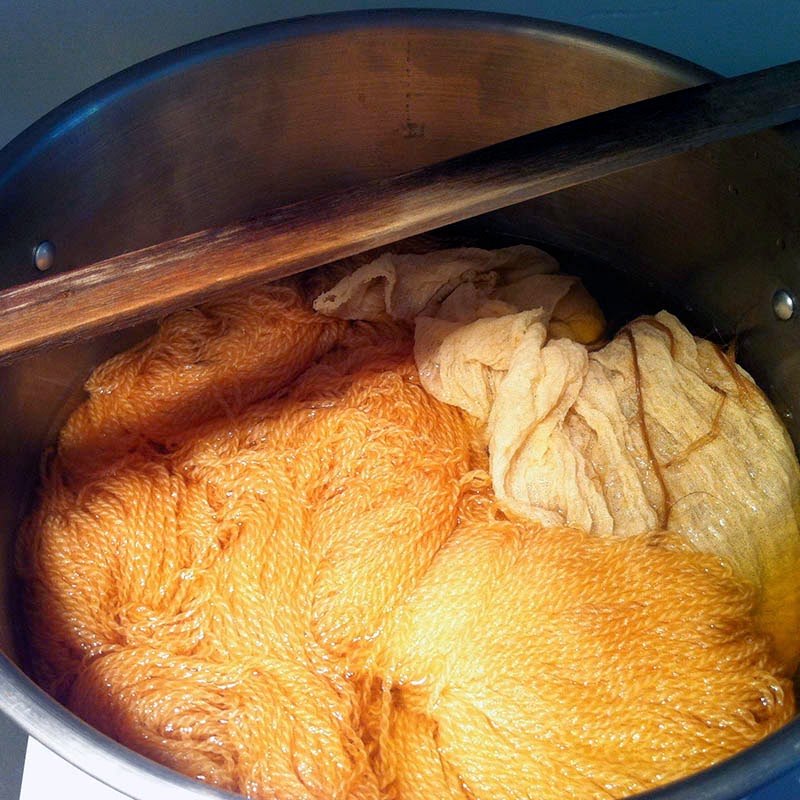
If you're curious about indigo dyeing, here are a couple of videos I found interesting. The first is about cloth-dyeing in India, and the second (specially for my fellow knitters) is about dyeing yarn. I must get some real indigo yarn to play with!

Dyeing with eucalyptus II

We had a wonderful time in Napier! The food was amazing, the weather was pleasant, and the hotel was great. And so was the main event! Congrats Jeff and Colleen, it was a lovely wedding. I'm so glad Willie and I were able to be there. <3

The day after the wedding, hordes of friends and family descended on the Grays' place for lunch. The best part for me was watching their (very bouncy) dog play with their three goats. We've been hassling Jeff to take a video to put online, because it's ridiculously entertaining...

Between the goat paddock and the beehives were some eucalyptus trees with blue-green leaves. I've been on the lookout for some accessible blue-green eucalypts to dye fabric with, ever since I read in India Flint's Eco Colour that these are the ones which give orange or red dye. I asked nicely, and picked a few good-sized twigs to experiment with back in Whakatane.


On Tuesday I had a go at Flint's 'eco-print' technique, scattering pieces of eucalyptus twigs between the folds of a plain silk scarf, rolling it around a stick, and tying the bundle tightly with string.


I tossed the bundle and some leftover leaves and twigs into a pot with enough water to cover it all, and boiled it all for 45 minutes. Then the hard part began - waiting until the next day to unroll the bundle and see what colours I had!

And... it worked! The scarf has areas of apricot-orange where the leaves were pressed tightly against the fabric, and paler areas in between. I didn't achieve strongly defined leaf prints, but I'm happy with my first attempt. I imagine tighter rolling and tying of the bundle would produce clearer prints.


If you click and enlarge this last photo, you can see stripes in the upper left corner from the string around the bundle. Pretty cool! It's amazing what just leaves + fabric + water + heat can do.

Slow Fashion I

I'm a little late with this post, but here it is - my intro post for Slow Fashion October! The month has barely started, and there are already a lot of great conversations happening in the knitting/sewing/crafting world. Bristol Ivy's Instagram post (plus its comments) on affordable, inclusive slow fashion is a thought-provoking example.

 And so, on to this week's prompt:
“Week” 1,  October 1-4: YOU
First let’s introduce ourselves: Where are you at with all this / What first got you interested in Slow Fashion / What are your skills / What do you hope to get out of Slow Fashion October / What are your personal goals for the month / Do you have a special project you plan to tackle this month?

I've been doing slow fashion for a long time. A fair proportion of my clothes and shoes are second-hand, and a few things are home-made by me. I struggle to find well-made natural-fibre clothes that are affordable, but I tend to have better luck in second-hand shops than elsewhere. I also have an odd-shaped body (with my sway back and total lack of hips), so making/altering my own clothes is often necessary for getting a good fit.

Of course, sewing and op-shop hunting can take a lot of time (that's the 'slow' part), and it can get frustrating if I can't find a very particular item which I need, and don't have the skills to make it.

My slow fashion skills are knitting (very confident), sewing (trial-and-error style), crochet (moderately confident), and spinning and dyeing (beginner-ish). This month I hope to make progress with a few projects, learn more about sustainable fabric dyeing, and get lots of ideas and inspiration from other participants. These are my plans...

Knitting

I'm trying to make more time to knit garments for myself, as I have a lot of must-make items in my queue. Lately I've been setting aside weekends as no-work-knitting time, which has been really refreshing. It's nice to knit from other people's patterns again! I've made lots of progress on my Royally Striped cardie, and I now have just the borders to go.

Here's a progress pic (not modelled, as it's 35 degrees and I am not putting on a woolly cardie):

Clockwise from top left: the lower back, the upper back, a sleeve, and a side.

Dyeing

Now that I have my own copy of Eco Colour, India Flint's amazing book on sustainable natural dyeing, I plan to embark on some more dyeing experiments. I've ordered a trio of lightweight ethically-produced wraps from Beautiful Silks - an unbleached linen wrap (to use as a sarong/scarf), an Australian merino wrap (for cooler weather), and a linen/silk blend scarf.

Sewing

I also have plans to sew a few simple summer clothes when I'm in Whakatane next month and can use Mum's sewing machine. I'm thinking a long, light skirt and a breezy top or two, as I really need some more warm-weather options. The sewing part will be in November, but I'll do some planning and fabric buying in advance.

That's all for now! If you use Instagram, do check out the #slowfashionoctober posts. <3

Henna appreciation

Willie helped me dye my hair with henna a couple of weeks ago, and I'm still admiring its redness every time I pass a mirror. ;)

Evening light = maximum glow!

The best instructions I've found are in the free 'How To' ebook by Catherine Cartwright-Jones. She's included lots of info on what henna is, its history, and how it works. She stresses the importance of using pure, body-art quality henna powder rather than buying a pre-mixed product (which can contain dodgy ingredients). I order my powder online.

We've refined our method over the years, to make the henna mixture easier to apply to my ridiculously thick hair. If you're interested in trying henna on your own hair, here are my tips (but do read the ebook for the full picture):
  • 100g of henna powder is plenty for shoulder-length hair if the mixture is fairly runny (with a consistency like crepe batter). We found this consistency easier to apply, although it does drip a bit during the waiting period.
  • Bottled lemon or lime juice works well for the mixture, diluted with water for a runny mix as above. Non-pulpy orange juice works well too (one with apple base is fine).
  • If the mixture is lumpy, you can smooth it out using electric beaters. 
  • Let the mixture rest overnight.
  • Before the application, spread old towels on the chair and surrounding floor. 
  • Have a willing assistant apply the mixture to your hair!
  • Important: start at the front of the head and work backwards (we found this much easier).
  • Use ‘crocodile clips’ to manage hair sections.
  • After application, use a damp soapy flannel to wipe henna off your face, neck, and ears.
  • Ensure the weight of your henna-coated hair is centred on the top of your head before covering it with plastic wrap and/or a shower cap.
  • Leave the mixture on for 2-4 hours, or until you've had enough.
  • Beware of drips! Wear an old towel around your shoulders and use the ends to wipe up any drips down your face/neck.

I only made it to three hours before washing out the henna last time, as the drips were getting on my nerves. The runnier consistency and shorter waiting-time don't seem to have made a difference to the result.

I hope some of this is helpful! I get around to henna-ing my hair about twice a year, and it's always well worth it. I love the way it works with the lighter and darker tones in my hair, adding a rich glow. My small collection of white hairs also take the dye well, turning brighter red than the rest. :)

Dyeing with lichen

(Photo by Dad aka Jos)

On the way back from Napier, Dad and I collected some Old man's beard or Tree Moss lichen (possibly Usnea arida) from the roadside, so I could use it for dyeing yarn. The old fallen pine branches were practically dripping with lichen, so I couldn't resist grabbing a few handfuls...

(Also by Dad)

I've dyed yarn with lichen before, using what I was able to scrape from Mum and Dad's birch trees. I like the fact that there's no need to use a mordant when dyeing with lichen (less hassle), and I like the earthy/salty/woody smell of the simmering dyepot. On my first attempt I got some lovely warm golden tones, which I used to make a Fibonacci-striped scarf:

My Baktus scarf, from September 2009

Unfortunately I wasn't able to track down the book I'd used as a guide last time, or the notes I'd taken, so my method this time around is probably a bit different! It's a more straightforward process than I used for last year's eucalyptus experiment - I decided to 'cook' the lichen and dye the yarn at the same time, rather than making the dye liquid in advance.

What I did:

I started with 28g of lichen, and a 200g skein of undyed yarn ('Naked' Organic Merino 4ply from Skeinz).


I used a big square of cheesecloth (thanks Mum) to make a lichen 'teabag' tied with string. I poured 8L of cold water into a big stockpot, threw in the 'teabag', and let it soak in the cold water for 1 hour.


Then I added the skein of yarn, let it soak for 20 minutes to make sure it was wet through, and turned on the heat.

I slowly (over the course of about an hour) heated the pot to a very low simmer. I kept the pot at that temperature for an hour and a half, giving the lichen 'teabag' the occasional prod and squeeze with a smooth-sanded stick (thanks Dad), and gently nudging the yarn to ensure a more even colour-distribution.


The yarn didn't seem to be changing colour any more, so I turned off the heat.

The colour was much lighter than I'd hoped - I think didn't use nearly enough lichen for this quantity of yarn! So Dad and I collected more lichen, this time from the birch and prunus trees in the garden. This batch weighed 77.7g (about three times as much as the first batch), and it looks like some of it might be a different variety.


I switched the old lichen in the 'teabag' for the new batch, and left it soaking in the old dyebath overnight (minus the yarn).

The next day I repeated the heating process, letting it simmer very gently for an hour. I let the pot cool completely before retrieving my yarn. I gently washed it with wool-wash, rinsed it again, squeezed it out, and hung it up to dry. The second round of dyeing left the yarn quite a bit darker, as I'd hoped! It has felted a little bit after the abuse of being dyed twice - I must have been a bit too rough with it. It's still usable thank goodness, it was just a bit of a pain to wind into balls.


Not a bad result! I really like the semi-solid effect. I think it will make a very nice shawl or large cowl. :)