Magic loop: yes, it is!

After my success with two-colour brioche for the It's New To Me KAL back in October, I decided to keep up my upskilling momentum and try another new technique that I've been vaguely meaning to try for years: magic loop!

If you're not familiar with it, magic loop is a method of knitting a small circumference in the round; an alternative to using double-pointed needles (which I'm prone to dropping).

Read More

Brioche beginnings

I'm learning to knit brioche, and I'm absolutely loving it! It's just so thick and squishy, and it makes colour combinations really sing...

I've been wanting to learn to knit brioche stitch for a long time. I even have one of Nancy Marchant's books on brioche, but sometimes my design knitting deadlines don't leave much space for playing with new techniques and knitting other designer's patterns. I finally got the push I needed when I heard about Karen of Wool Gathering Australia's It's New To Me KAL (Ravelry link). There are a few of us knitting our first two-colour brioche projects for the KAL this month, and sharing tips and encouragement.

If you're not familiar with brioche stitch, here are some examples of designs from my Ravelry favourites which I think really show off its strengths and possibilities (all links are to Ravelry pattern pages):

  • Really bold stripes and zigzags in two or more colours - Stephen West's Askews Me Shawl and Briochevron Wrap (which I plan to make one day as a sock yarn stash-buster)

  • More subtle two-colour brioche, with garter stitch as a contrasting texture - Andrea Mowry's What the Fade!? shawl, Bristol Ivy's Jemison cowl from her forthcoming book Knitting Outside the Box, and Lesley Anne Robinson's Unda shawl (which has a very subtle colour pairing)

  • Classic, cosy texture in a single colour - Jared Flood's Oshima sweater, and Olga Buraya-Kefelian's Gren mitts

  • More complex texture in a single colour - Bristol Ivy's Lisse shawl and Burke cardigan, and Norah Gaughan's modular Counterpane sweater.

The pattern I've chosen to knit for the KAL is Katrin Schubert's beezee hat. I chose a hat because it's a manageable-sized project (I was tempted to try for a large shawl or wrap, but I have other projects to finish!), and I chose this design because I liked the boldness of the stitch pattern. It's my current weekend project, which I've been chipping away at when I'm hanging out on the couch.

I dug through the DK yarn in my stash and chose a speckled main colour, 'Koi' on Walk Collection Cozy Vintage, and a calm grey background colour, 'Eastern Reef Egret' on Circus Tonic Handmade DK:

I'm knitting the biggest size, and I can tell it's going to be a long, slouchy kind of hat. I've just reached the start of the crown decreases, so there's not much more to go.

If you're keen to try knitting some brioche, I recommend just diving in! Here are a couple of resources I used when I got stuck (for example, the first time I had to work a decrease):

Swatching in the round

Swatching in the round is something I know I should do if my project will be knit in the round, but I admit I sometimes swatch flat instead, especially if the stitch pattern is easy to work flat (like stockinette or a knit/purl texture). But for an important project like a garment or something else that will take a lot of yarn and time, there's no way around it - swatching in the round will give you the most accurate gauge information.

In this post I'll be showing you how I knit the swatch for my Cinnamon Stars cowl. The method will work for any stranded colourwork project, and for any other project knit in the round.

Read More

Craft holiday II

My post-Christmas break in NZ is nearly over, so it must be time to show off all the things I made! Like my previous craft holiday, I took full advantage of having access to Mum's sewing machine. This time I made tops using downloadable indie patterns. I haven't had much experience sewing from patterns (as opposed to following photo tutorials on blogs or just figuring things out myself) - so I learned a lot along the way. :)

I started off making a Wiksten top out of some lightweight cotton fabric with a diagonal tie-dye stripe. I enlarged the pattern one extra size, which worked well - hooray for drawing skills! The fit is pretty good, certainly good enough for a casual top.

I dove into making a second one, this time using a crystal-print cotton sateen fabric from Spoonflower and plain white bias binding. Mum thought the fabric was far too heavy for a Wiksten top, and (surprise, surprise) she was totally right - it didn't drape well, so the not-quite-right fit around the armholes was very obvious. She fixed the problem by demonstrating how to put in some small darts above the bust line - thanks Mum!

I moved on to another pattern for my next sewing adventure, a Fen top in a black linen-cotton blend. Instead of following the pattern's instructions I kind of did my own thing while sewing it up. This worked out very well with the bias binding around the neckline (which is super tidy if I do say so myself):

However, I messed up with the seams - I decided to do French seams again, but didn't realise it would cause problems with the curved underarm seams. Luckily the fabric looks the same on both sides, so I just decided to turn the top inside-out and continue. It's not a mistake, I declare, it's a design decision to have my French seams on the outside. ;)

Again, my fabric was a bit too heavy for the pattern, but I think it looks ok this time. It's certainly a very comfortable, roomy top. I'll be looking out for lighter, drapier fabrics to make more Fen tops the next time I do some sewing.

Learnings:

  • using proper patterns isn't hard or scary

  • I can enlarge a pattern if necessary by looking at the outlines of the other sizes and just drawing one size further

  • bias binding isn't hard to get nice and tidy (if you use the iron a lot)

  • fabric choice is IMPORTANT - pay attention to the pattern's fabric suggestions, and Mum's warnings

  • French seams are awesome, but not for curved underarm seams

  • linen / linen blends are easy to work with

  • bust darts are my friends

--------------------------------------------------------------------------------------------

I've also been knitting away on a new scarf design which I plan to release in the next week or two, once it's all photographed and polished up. Here's a peek at the scarf-in-progress...

Dyeing with eucalyptus II

We had a wonderful time in Napier! The food was amazing, the weather was pleasant, and the hotel was great. And so was the main event! Congrats Jeff and Colleen, it was a lovely wedding. I'm so glad Willie and I were able to be there. <3

The day after the wedding, hordes of friends and family descended on the Grays' place for lunch. The best part for me was watching their (very bouncy) dog play with their three goats. We've been hassling Jeff to take a video to put online, because it's ridiculously entertaining...

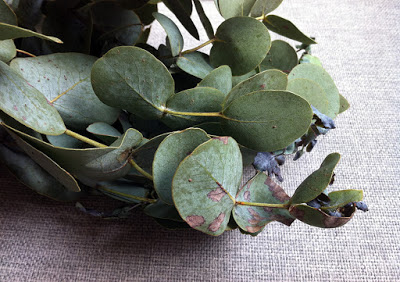
Between the goat paddock and the beehives were some eucalyptus trees with blue-green leaves. I've been on the lookout for some accessible blue-green eucalypts to dye fabric with, ever since I read in India Flint's Eco Colour that these are the ones which give orange or red dye. I asked nicely, and picked a few good-sized twigs to experiment with back in Whakatane.


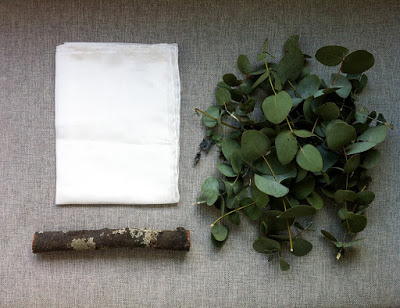
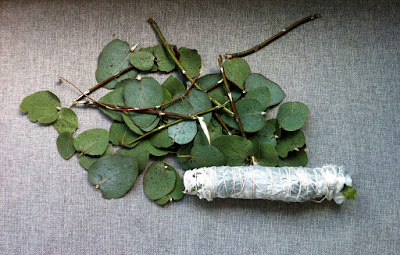
On Tuesday I had a go at Flint's 'eco-print' technique, scattering pieces of eucalyptus twigs between the folds of a plain silk scarf, rolling it around a stick, and tying the bundle tightly with string.


I tossed the bundle and some leftover leaves and twigs into a pot with enough water to cover it all, and boiled it all for 45 minutes. Then the hard part began - waiting until the next day to unroll the bundle and see what colours I had!

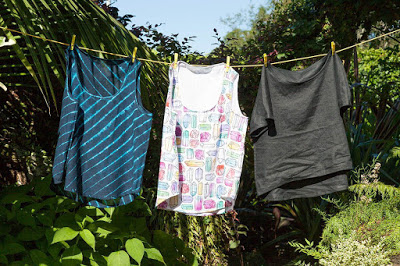
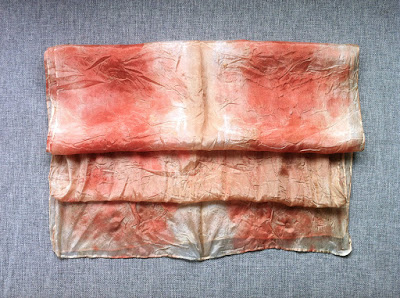
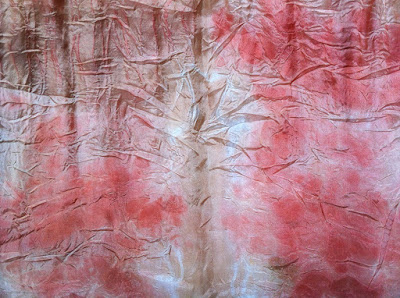
And... it worked! The scarf has areas of apricot-orange where the leaves were pressed tightly against the fabric, and paler areas in between. I didn't achieve strongly defined leaf prints, but I'm happy with my first attempt. I imagine tighter rolling and tying of the bundle would produce clearer prints.


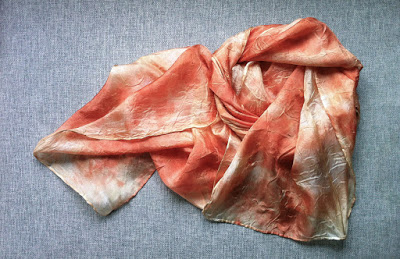
If you click and enlarge this last photo, you can see stripes in the upper left corner from the string around the bundle. Pretty cool! It's amazing what just leaves + fabric + water + heat can do.